Sunday, March 2, 2025

Repair Notes for Jaibaile 1:43 RC drift car


A friend recommended this RC toy car from Jaibaile. It's a 1:43 scale RC car that's really zippy. The gyroscope on board seems to make it corner more like a real car, although I'm still trying to understand exactly what the gyro does. It's been a ton of fun and great value. The car syncs to its remote on power-on so you can run several at once to race. However, mine has spent more time on the shelf waiting for repair than it has spent ready to run. Here's what I've discovered about repairs:

Car turns on, but frequently de-syncs from the remote

The lights turn on, and may even control normally for a while, but will stop responding to the RC remote after a while. For me, this issue was low battery voltage. Replacing the batteries in the remote and charging the car helped, but the problem quickly returned. In the end, the permanent fix was to swap in a replacement LiPo battery. You'll need a 3.7V LiPo battery with Connector type: MX1.25-2P, female. This one worked for me. Make sure you order a part with the positive and negative terminals wired to the MX connector like so:


 Installed in the car, the battery looks like this. This battery is too large to fit in the same housing, so I just tuck it under the roof of the car body


The steering is jittery

The next problem I had was that the wheels would jitter or vibrate while turning. This one turned out to be a burnt-out servo. The servo that came with the car doesn't have any markings and doesn't seem to be a standard size so finding a replacement was a real challenge. I did find servo model S0002P from Surpass Hobby that's a near-enough fit. The plastic cover that holds the servo-motor in place doesn't fit over the S0002P so I had to super-glue it to the frame, which isn't ideal. But it does seem to have the same voltage characteristics and range of motion as the original. The S0002P also comes with the wrong connector so I had to swap out the connector from the old, broken servo. Note that the seller I linked has several models on the same page, but only the S0002P fits.

Front wheel stops turning / car spins around front wheel

One of my front wheels stopped getting power from the drive motor. It would turn freely, and steer, but not drive making the whole car spin around that front wheel. This one turned out to be a snapped tie rod between axle and the wheel. Super glue didn't create a strong enough bond to simply glue it back together, but it might have worked better if I was able to clean the grease off the tie rod more thoroughly. Instead, I used a hobby knife to cut a new tie rod from some left-over plastic sprue from another project.


I have a feeling this is not the end of the repairs this car will need. I'll keep posting if I find anything else worth sharing.




Sunday, February 28, 2021

Free Linear Graph Template with Error Bars, Max and Min, and Feedback for IB Physics

Yet again, I've remade the IB Physics Graphing Template. This latest version is the best one yet:

IB Physics Graphing Template


Try it out. It's totally free and runs in your browser: http://beepboopmachines.com/

Features:

  • Graphs linear data with error bars and automatically generates a best fit, a steepest (max) fit, and a shallowest (min) fit.
  • You can reshape the trendlines by clicking and dragging them if you happen to not like the auto-generated trendlines.
  • Produces feedback about your data and graph. This will help you check to make sure you didn't miss anything important (like a graph title), and can also help you identify important talking points for a conclusion or evaluation.
  • Runs in your browser for compatibility with Windows, Mac, Linux, and even mobile or tablet!
  • You can share your graph as a URL if you want other people to work with your example. Great for teachers making examples, scaffolding, or tutorials.
  • Data table automatically grows to handle large amounts of data
  • You can enter data in a variety of forms: decimal (eg 0.00045), scientific (eg 4.5x10^-4), percentages (eg, 15%), and bizarro calculator format (eg, 4.5E-4)
  • The overall size, gridlines, titles, labels, units, and symbols in the graph can be edited by clicking anywhere on the title, legend, or axis labels. 

You can edit the properties of the graph by clicking anywhere on the title, legend, or axis labels


Let me know in the comments what you think. Some known issues:

  • I haven't tested the application in every browser and OS. 
  • Sometimes produces some pretty extreme max and min slopes. I haven't developed a good algorithm to handle every case. Drag the lines around if it comes up with lines you're not happy with
  • The performance of the program will drop as you add more and more data. 

Tuesday, March 6, 2018

Use Existing SQLite Database in Android using SQLDroid JDBC Driver

In Android the recommended SQLite database access method is to create a new database using the SQLiteOpenHelper class. However I wanted to be able to load a pre-existing SQLite database into an Android application and access it with a JDBC driver.

The reason is that I want my students to be able to play around with making a database with an application like SQLite Browser and then build on their work in their applications. I also wanted all of my students using similar database access methods so they can help each other as much as possible so I wanted them using JDBC. I've found that it is possible but first a few warnings:

  1. This method is inappropriate for large databases as it duplicates the whole database doubling the memory footprint
  2. This method also pulls in an external JDBC library, SQLDroid, further increasing footprint size
  3. The SQLDroid library is not guaranteed to be complete or correct across all android devices
But if you still want to load your existing SQLite database into your Android project and access it with a JDBC driver, here's how you can do it. I've started a fresh, empty project to try to keep it as simple as possible:

Move your existing SQLite database into your projects 'assets' folder

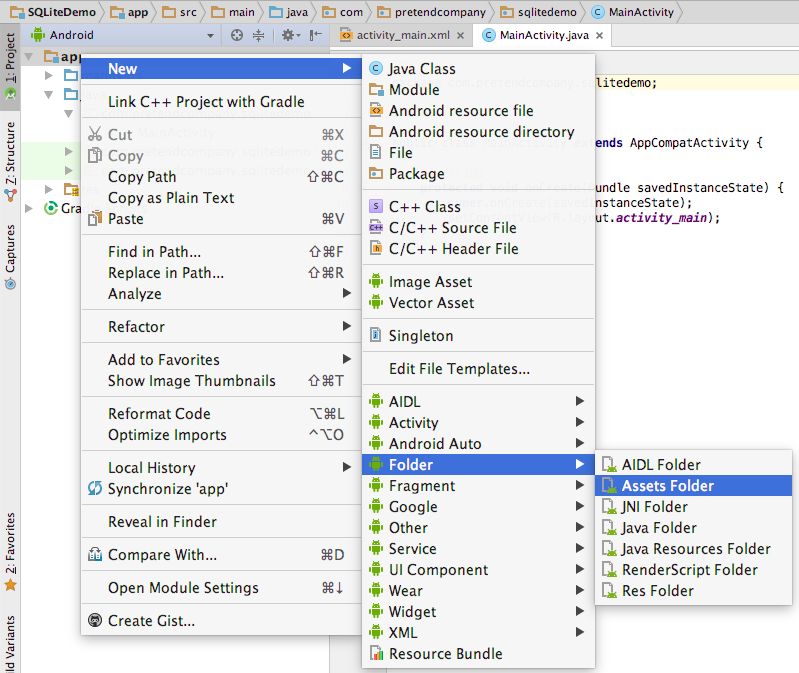
First you may need to create your assets folder if you don't see it in your project already

- right click on your project, select New > Folder > Assets Folder


- add the 'assets' folder to your main project:


- Navigate to your assets folder in your file browser (finder or windows explorer etc). I found it in /app/src/main/assets


 - drag and drop your database into this folder and it should appear in android studio. My database is a database of birds.


(Now is a good time to run your program and make sure it still runs without run-time errors!)

Add code to your project to copy your database into internal memory on the phone

The assets folder is a read-only directory that gets packaged up into your .apk to load on the phone. But we want to continue to add and remove from the database so when the app is run for the first time only, we will copy the database into internal memory.

- In your main activity, create a method called LoadDatabase and call it in the onCreate method. You'll also need a string called 'dbName' and four imports shown below for later


- In LoadDatabase,  check to see if there is already a database in Internal Storage. If not, copy it over from Assets


(Now is a good time to run your program and make sure it still runs without run-time errors!)

If you're running your phone at API level 23 or less, you should be able to use Android Device Monitor to see your new database file in Internal Storage after your program runs! 
 - Android/tools/Android/Android Device Monitor
 - select the file 'explorer' tab
 - navigate to data/data//files


Add the SQLDroid JDBC Driver to your project

Open your Gradle file (Module: app) and add this line:


- Save and Sync your Gradle file


(Now is a good time to run your program and make sure it still runs without run-time errors!)

Access your database in Internal Storage using your JDBC driver

- back in the main activity, I've added another method called 'TestDatabase' and called it from the onCreate Method


- We'll need a few more imported classes:


- Then we can load the SQLDroid JDBC driver and use it to make a connection to our database in Internal Storage.


In this case I'm using the JDBC driver to read all the 'BirdSpecies' records from my table 'BirdList' but you can use other SQL methods to read and write whatever is appropriate for your database


Run your program

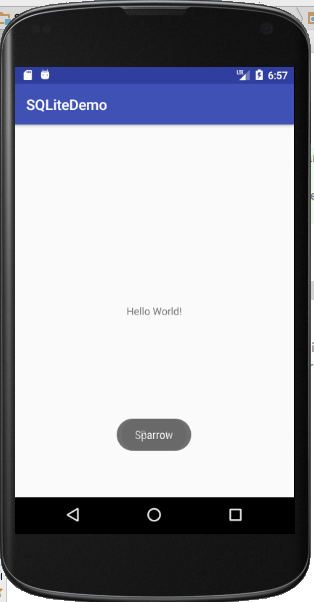
Run your program and hopefully your data will appear as a toast as soon as the program loads. Here you see sparrow appear as a 'Toast'. 'Parrot' follows next


Many thanks to the SQLDroid team for the driver and Juan-Manuel FluxĂ  for demo code on loading databases from Assets to Internal Storage

Hope that helps!

Tuesday, April 11, 2017

O'Neill Tennis 1.02 - Tennis on a Rotating Space Station

Back in 2014, I made a simulation that modeled throwing a ball in an O'Neill Cylinder and challenged anyone to make a 3D tennis game set on the same rotating space station. Three years later I've answered my own challenge and along the way learned about cross-platform development in Unity. The end result is this:

ONeill Tennis 1.02


You can download for Windows, Mac, or Linux .

The game itself is only moderately fun but I really enjoy just watching the ball move through the air. It's so hypnotically different to motion on earth.

If you want to play around with the project further you are welcome to build off my source code (available here) for any purpose. Changing player speeds, rotation rates, and ball speeds should be as simple as changing a parameter in GameBehavior.cs.

Wednesday, March 1, 2017

Science EE Wisdom Generator

At the end of the EE journey, I always ask students for advice they would like to pass down to future students. I've complied all their advice together and built this Wisdom Generator for Science EEs.


If you would rather not wait, you can click on the wisdom tab and read through the whole list one-by-one.

Monday, May 23, 2016

IB Physics Example Videos

It's taken about 2 years but I've finally finished a set of IB Physics Example Videos! (131 of them to be exact!)


The whole process started years before that when I found myself frustrated by how much content there was to discuss/apply/investigate in IB Physics and how little time there was to get it all done. My solution is to take most of the examples that I would normally do in class and record them as example videos for the students to watch before they attempt their homework.

I find that this frees up anywhere from 10-30 minutes per lesson! We have so much time available now that I've restructured my whole lesson plan:


  • First 10-25 minutes - Unstructured time for students to address their individual needs:
    • Get help from peers or teacher on homework questions or unclear topics
    • Read Ahead
    • Investigate Extension
    • Meet to discuss performance, study skills, etc
  • Remainder of the lesson - Lecture, Prac, Investigation, Groupwork, etc on new content
  • After the lesson - students watch example videos and attempt homework. They flag the questions they get stuck on and return to the next lesson to get help


Some topics have more examples than others, but every required HL and SL topic (and the HL/SL Astrophysics Option) has some examples. If you think something major is missing let me know but I don't think I'm going to be returning to this video set for a while. I'm on to my next challenge: starting up an IB Computer Science class!

If you are an IB Physics student or teacher feel free to use these example videos as you see fit.

Thursday, May 19, 2016

IB Physics Extension

One of the things I like to do in my class is allow students some time at the beginning of the lesson to help each other with their homework questions. The challenge, though, is making sure that students who are on top of things and aren't busy helping others can still be productive during that time.

To that end, I've compiled a collection of IB Physics Extension pages. The idea is that for whatever part of the syllabus your students are currently working on, there's some kind of related, self-guided extension that they could explore. It might be:

  • An interesting article on related science
  • A really tough problem
  • A thought-provoking video or application
  • A neat simulation


Just this week I've finally complied enough pages that there should be at least one page for any lesson in the IB Physics course, so no matter what lesson you're on you could always refer a student to the collection of extension topics.

You'll find all the pages here: https://onedrive.live.com/redir?page=view&resid=87532983CCE41649!742&authkey=!AO1VuIbAaVJkrkc

I find that I get the best uptake on this extension if I spend a minute of class time introducing a page or two before students break out into their work.

The collection is still growing so let me know if you spot something neat you think I should add!

Wednesday, February 10, 2016

Free Linear Graphing Template for the 2016+ IB Physics Syllabus

 Update: new, free, version released. See post here.

 
Download the Free Version of the IB Physics Graphing Template for 2016+ Here!

Enter your Data and Uncertanties and Let Excel Draw your Graph!
IB Physics Students Graduating in 2016 and later face a larger and more sophisticated Internal Assessment (IA). When it comes to making Linearised Graphs, the biggest difference is that students should now consider all their data when drawing best-fit, max, and min trendlines. 
Fortunately, I've updated the IB Physics Graphing Template to help do just that! Now when it calculates the max and min trendlines, it will search through every possible combination of corners of your data and select only the most extreme slopes that pass through all your error bars:

The Max and Min Trendlines consider all data points.

That's not the only update. Based on my experience with my own students, I've added a slider to adjust the number of significant figures reported in the trendline equations:

You can adjust the number of Significant Figures in the trendline equations.
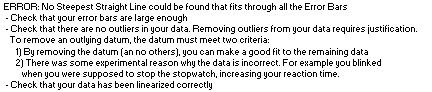
The last big update is that the template now offers you feedback on your graph and data, to help you spot mistakes, make your analysis, and draw conclusions! For example, the last data point in this graph appears to be preventing any straight line from fitting through all the error bars:


The last data point appears to be preventing any straight line from fitting through all the error bars
To help students catch these issues, the template offers feedback:
The above error is automatically generated to let you know that something has gone wrong with your graph

Anyone can download and share the free version of the template which offers all the above features forever for as many graphs as you like. If you are a Physics teacher, you may be interested in purchasing a school-wide license for the full version which offers two extra features:

Additional Full (Paid) Version Features:

  • Demonstrate Animated Graphs (like the video at the top of this post)
  • Receive further feedback beyond error messages. How much frustration will you save if your students were automatically reminded of key bits of information like:

Example of Additional Feedback available in the Full (Paid) Version


Example of Additional Feedback available in the Full (Paid) Version
The full version comes with a school-wide license that doesn't expire, or require account management. Just share the file with your students like you would any other file. You can purchase the full version from the store in the upper right hand side of this page.

FAQ


Operating System Compatibility:

No matter what your operating system is, your going to need Microsoft Excel installed. The template will not work with other spreadsheet software like Numbers, Open Office, or Libre Office.
The template works very well in Windows, and acceptably well in Mac OS although I would suggest you download the free version to test functionality on your system before buying a full version license. Linux is untested at this time.

Macros:
 Because this template has a lot of new, sophisticated functionality, it wasn't possible to build it without Macros. Macros are extra bits of software written by the spreadsheet author (me, in this case) to add functionality to the spreadsheet. You must enable macros to run this software. If in doubt, talk to the IT department at your school.

Support:

 I'm not able to offer a guarantee of support but I will do my best to help you out if you have problems. Just post a message in the comments below and I'll get back to you. I'd recommend you check out the free version before buying the full (paid) version to make sure it meets your needs.

It's Running So Slowly!

In my experience the process of drawing the graph takes quite a while if: your on a Mac, you have a lot of data, or you are animating the graph. To keep things running smoothly, consider un-checking the "automatically generate graph" box. Once you've finished entering your data and uncertainties, then click the "generate graph" button. This way, nothing happens in the background until you're ready.

Tuesday, December 1, 2015

Flexible Lab Request Sheet

Are you a Science Teacher? Do you have trouble keeping your lab equipment requests organised?

At the school I'm working in now, there are so many science teachers that laboratory equipment really needs to be handled by dedicated staff to prevent clashes, fix breakages, and manage inventory. For me this presented a new challenge because I was accustomed to digging through the supply closet myself and pulling out whatever I wanted on the day. Now I have to have my lessons planned more than a week in advance. I have to actually be organised!

The big issue there is that in the space of a week, a lot tends to change. I found that I was spending too much time chopping, changing, and re-thinking plans I had already laid out. Flexibility in planning will always be necessary so instead I did the next best thing and made my planning process more adaptive. I wrote a Google Sheet that automatically organizes and re-organizes my lesson plans. Major features of the Planning Template include:

  • Planning is done chronologically in a single column for easy cutting and pasting big blocks of lessons.
  • The planner automatically fills in a week-by-week template of what equipment needs to be delivered when based on the chronological plan and automatically updates based on any changes
  • Disruptions (like holidays, or sick days, or surprise assemblies) can be added on the fly and the week template will adjust.
  • The planner can be shared with students, parents, and colleagues so that everyone can know what is going on, and when.

Walk-through of features and set-up

If you want to try out the planner for yourself, you can go for it! You'll need to make a copy of the file to use it yourself:

Make a copy


Thursday, July 2, 2015

Winning the "Pick Things Up for Me, Daddy" Game

I guess my daughter is still too young to intentionally drop things on the floor so she can watch me pick them up, but I think I'll try an ounce of prevention.

I picked up a suction-cup hook from Daiso meant for hanging your loofah in the shower. I replaced the hook with a length of ribbon and a small carabiner. The suction cup sticks to the surface of her high-chair and the carabiner can clip to most of her toys.


I think I might cut the ribbon to be a bit shorter so that:

  • Toys don't fall off the edge of the chair at all
  • the ribbon presents less of a strangulation hazard.
Pictured: Strangulation Hazard.
Or maybe I'll try a slip-knot so I can adjust the length as needed.

Thursday, December 4, 2014

Bored Taking Notes? Turn Word into a Colorful Disco Dance Party

I don't know why I made this. I have a feeling I will regret unleashing this creation on the world. A created a Word document in which all the letter, number, punctuation, space and enter keys are all bound to a macro that changes the background color, font color, and font size as you type. The result looks like this:

A Terrible Thing
You can download the word document with the embedded macros here (requires Word for Windows. If you have Word on Mac you can use this version. Changing background colors is not supported in Word for Mac).

I typed up instructions into the document for you. It looks like this:
1) You must download this file and enable macros for this document to work
2) If nothing happens when you start typing, press Alt+F8 and run the "Add Binding" macro
3)  To end the typing party, press alt+F8 and run the "RemoveAllBindings" macro
4) To view or modify the functionality of this macro press alt+F11

Thursday, November 6, 2014

ChargeLab 1.01 - Famous Last Words

"I think I'm finally done with ChargeLab."
I should have known better than to boast. In version 1.00 I re-thought how I calculate potential so that at large distances potential approached zero, and at near distances it approached + infinity. What I didn't notice is that this adjustment completely broke the way that field lines lie. I'm releasing version 1.01 with the following features and fixes
  1. Re-worked the way that field lines propagate so that they come out smoother and intersect less frequently.
  2. Reverted the method for calculating potential so that the field strength inside of charged surfaces remains zero.
  3. Remove the ability of the user to measure potential. This is really just a hack to hide the fact that the values of the potential don't work out as expected.
Reverted Potential Calculation correctly identifies the field strength in the center of a charged surface as zero. 

New Smoother Field Lines!


I think this will be the last version. Not because there is nothing left to do but because I am well and truly stuck. The problem is that the formulas we are used  to seeing for calculating potential and field strength in our three dimensional world don't seem to work in a two dimensional simulation. To adjust for the missing degree of freedom in which charges can move, I modified the formulas:

F = Force
V = Potential
k = Coulomb's constant
k' = An arbitrary constant
q = charge
r = Distance from charge's center
To transform the formulas into two dimensions I integrated with respect to distance, r. This seemed to do the trick for Force and Field Strength:


There are no negative distances in this simulation and both functions behave very similarly in the first quadrant. With these changes I got the slight change in behavior I needed. Charges spread out on the edges of surfaces and produced no field strength within surfaces.

The problem comes in when we look at the structure of Potential in 2 and 3 dimensions:


In 2 Dimensions, the natural log has much different behavior to the inverse function found in three dimensions. In 2 Dimensions there is a finite, non-zero distance from a charge where the potential is zero. Beyond this point, the potential changes sign and grows slowly to infinity. I'm struggling to understand the significance of these differences but I observe that they produce the desired potential gradients in two dimensions. 

I would be interested in hearing your thoughts on this puzzle.
  • Are the transformations above appropriate or do they only appear to work by coincidence?
  • Is there a better way to simulate forces and potentials in two dimensions?


You can download the latest version of ChargeLab here.

Source code available here.

Wednesday, October 22, 2014

ChargeLab 1.00 - Simulating Electric Fields

I think I'm finally done with ChargeLab. I made a few fixes and I'm pretty happy with the final result. The new features are:


  1. The number of field lines coming out of charges are now proportional (roughly) to their charge
  2. Fixed the bug where potential was zero at the center of charges. Now it's zero at infinity.
  3. Fixed a bug with termination of field lines. This should speed up field line calculation as well as help prevent field lines from terminating in empty space.


The Field Line Density is higher where the Field Strength is higher.
You can download the latest version here.

Source code available here.

Friday, September 19, 2014

New Videos: Falling through Tunnels in the Earth

This is a classic question that I remember seeing when I was a high school student: "How long would it take to fall through a tunnel through the Earth?" My Physics teacher solved the question for us and I'll have to confess only understanding the solution for about 30 minutes. Today I went back and re-worked the question myself. I've presented the solution in two parts.

First, what is it like to fall straight through the earth:


Second, what if the tunnel doesn't go through the Earth's center? What if you want to connect NY to LA for example?

Thursday, July 10, 2014

IB Physics Graphing Template for the 2016 Syllabus

Update: The New IB Physics Graphing Template for the 2016+ Syllabus is out! Follow this link to find out more!


This is a work in progress so stay tuned for updates, but I've been re-working the physics graph template for the new requirements in the 2016 Physics Syllabus. The major change is that max and min slope lines now need to consider all data, not just the first and last point.

You can download the updated version here but there are still a few issues (especially when you have data on the negative side of the x-axis). I'll be updating the file soon.

Largest Triangle Between Sine and Cosine

I saw an interesting question posted online. The author wanted to know what the largest triangle that would fit between a graph of y = sin(x) and y = cos(x) would be.

What's the largest triangle that will fit between the blue and green lines?
I haven't been able to come up with an exact solution using geometry or algebra; if you can do it, I'd like to hear how. Instead I made a tool in excel which animates the process of finding an approximation of the solution by exhaustion:


The program searches through all the different triangles to find the largest
If you'd like to have a peek at which triangle is the biggest you can download the excel file here.

Friday, July 4, 2014

Autophile: Automatically Sort Files into Folder by Name

I like to mark my student's reports electronically rather than mark paper copies. I type faster than I write and I can copy/paste verbose comments when students do similar things. The major drawback is getting the work back to the students; it's always a painstaking process to manipulate each file into an email or a folder. To reduce that grunt-work I wrote a program that will move files into folders with similar names. I call it Autophile.


The idea is to get your students to put their student ID in the file name so that the software can sort each student's work into their own folder on the network drive. Choose the files you want to sort, select the folders you want to sort them into, adjust settings, and click "Sort"


A confirmation window will pop up telling you where the program thinks each file should go. You can make adjustments or cancel the process. Clicking "Apply Sort" will move the files.

Confirmation Window
The program computes the best match between folder and file by computing something called the Damerau–Levenshtein distance. Basically, it's the number of letters you would have to substitute, remove, insert, or swap to make a portion of the file name look like the folder name.

I was having problems with very short folder names getting picked up as the best match so I modified the result a little bit to favor longer, less accurate matches over shorter accurate matches. I weighted the D-L distance at 100% and the match length at 90% when doing the comparison. For example, I wanted to favor a match that was 5 letters long with one letter wrong over a match that was 3 letters wrong with no errors.

You can download the program here or the source code here.